I welcome you all here who want to setup their custom domain for blogger blog. If you have purchased a domain name from domainz.in and want to point your blogger blog to your custom domain through domainz.in, then this post will help you.
Google blogger blog is a free and famous blogging platform which lets you to create a free blog and google hosts your blog free on blogspot that is why your blog address or url is like blogname.blogspot.com. Now when you setup your custom domain for blogger then your blog address will be changed according to you custom domain or extension name for instance www.orihec.org. and you can continue your blogging through blogger as you do always.
Domain setup
Now let's begin the process of setting up domain name through domainz.in. Login to your cpanel and go in Advanced DNS Zone Editor.
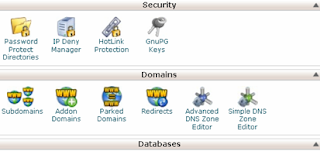
As you enter the advanced dns zone editor, you will find three options on the page, Reset Zone file, Add a Record and Zone File Records. Just head toward Zone file record.
 Here you have to create domain CNAME record. Go to you domain name and click on edit. Now when you click on edit you will get four options to fill as you can see on pic above.
Put you domain name with www. on name option as shown example on the pic
TTL: 14400
Type: CNAME
CNAME: ghs.google.com and click on edit record button.
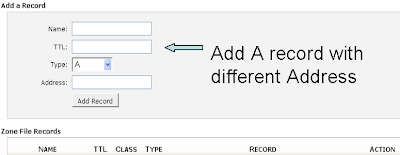
Now you have to create four different A records types. Just look for your domain (without www.) which is in A type to add A records as you can see on pic below. Click on edit and put
Name: your domain name(without www.)
TTL: 14400
Type: A and
Address: 216.239.32.21 and edit it. In this way you have to add three more different A records.

You may find only one option here for editing A record that is why you have to add those other three A records through Add record option(see the pic below) which you will find just above the Zone file records. Just fill the same name, TTL and Type as you created the first one for A records only the Address will be changed that is 216.239.34.21 and again, add another two A records with the same process with the Address: 216.239.36.21 and 216.239.38.21 and you are done. Wait for half an hour to one hour after finishing all these process before moving to blogger blog for final step.
Final Step
Go to your blogger blog in basic setting and click on 'Add a custom domain', which you will get under publishing blog option. Click on 'Switch on advanced setting' and type your custom domain name and save it. Hope you have liked this and understood the process very well. If you find any difficult in implementing this then you can ask your queries through comment box.

Google blogger blog is a free and famous blogging platform which lets you to create a free blog and google hosts your blog free on blogspot that is why your blog address or url is like blogname.blogspot.com. Now when you setup your custom domain for blogger then your blog address will be changed according to you custom domain or extension name for instance www.orihec.org. and you can continue your blogging through blogger as you do always.
Domain setup
Now let's begin the process of setting up domain name through domainz.in. Login to your cpanel and go in Advanced DNS Zone Editor.

As you enter the advanced dns zone editor, you will find three options on the page, Reset Zone file, Add a Record and Zone File Records. Just head toward Zone file record.

Put you domain name with www. on name option as shown example on the pic
TTL: 14400
Type: CNAME
CNAME: ghs.google.com and click on edit record button.
Now you have to create four different A records types. Just look for your domain (without www.) which is in A type to add A records as you can see on pic below. Click on edit and put
Name: your domain name(without www.)
TTL: 14400
Type: A and
Address: 216.239.32.21 and edit it. In this way you have to add three more different A records.

You may find only one option here for editing A record that is why you have to add those other three A records through Add record option(see the pic below) which you will find just above the Zone file records. Just fill the same name, TTL and Type as you created the first one for A records only the Address will be changed that is 216.239.34.21 and again, add another two A records with the same process with the Address: 216.239.36.21 and 216.239.38.21 and you are done. Wait for half an hour to one hour after finishing all these process before moving to blogger blog for final step.

Final Step
Go to your blogger blog in basic setting and click on 'Add a custom domain', which you will get under publishing blog option. Click on 'Switch on advanced setting' and type your custom domain name and save it. Hope you have liked this and understood the process very well. If you find any difficult in implementing this then you can ask your queries through comment box.

Comments
Post a Comment